Once a face has been activated, it is possible to create a mission on that face. There are 2 types of mission: blind mission, and mission with expected.
Creating a blind mission

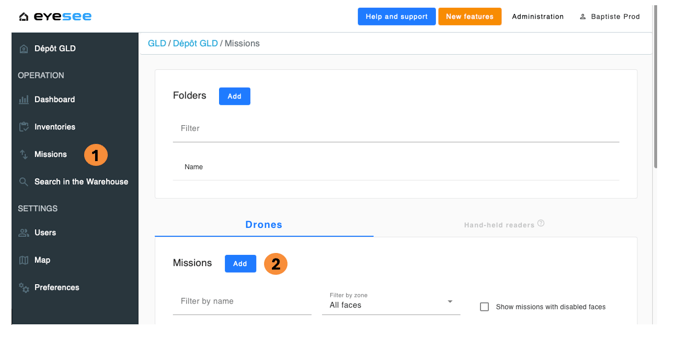
1. From a warehouse, click on Missions.
2. Click on the add icon.

Then enter:
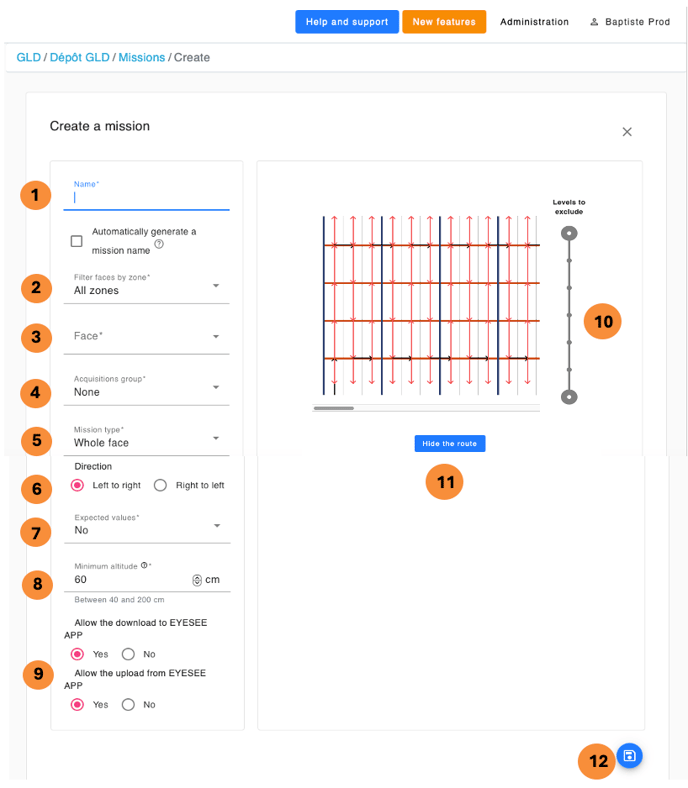
- Name: the text area is empty and free, but a naming system is recommended for the missions. For example:
- Aisle01_P: for a mission of all the P face in the 01 aisle
- Aisle01_001_015: for a mission from the 001 to the 015 columns in the 01 aisle
- Spot_A01P0065001: for a spot mission at the 01 location of the 006 column 50 level on the P face in the A01 aisle
- Zone: filter the desired face by selecting the zone in which it is located.
- Choose the face: select the desired zone from the drop-down list, then choose the face on which the job is to be created. When selected, the preview is automatically displayed on the right.
- Acquisition group: select from drop-down list. If a group is defined by default for a zone, it will be automatically selected. The list of acquisitions present in the chosen group appears. For more details, click on the "?".
-
Mission type :
- Entire face (default)
- Between two columns: the drone scans all locations between the two specified columns.Click on the face to select the start and end columns.
- Between two locations: the drone only scans locations between the two specified. Click on the face to select the start and end locations.
- Spot: the drone scans the single location defined by the mission. Click on the side to select the location to be checked.
- Direction
- Expected value: In this case you have to leave "no"
8. Minimum altitude: IMinimum altitude at which the drone will descend to level 0 (recommended value: 60 cm). The value is defined according to the label placement on the pallets. Example: Level 0 is 180 cm high, with pallets of varying sizes, but at least 100 cm high. The label is placed towards the top of the pallets. The minimum height can be set to 80 or 70 cm.
9. Allow the download on EYESEE App : allows the mission to be uploaded to the EYESEE APP.
Allow the upload from EYESEE App: allows the mission carried out from EYESEE APP to be uploaded to the Cloud.
10. Level to exclude: slide one of the two circles to disable one or more levels during flight.
11. Show the route: visualize the drone's path
12. Save
Now, the mission can be downloaded on the tablet.
For more details:
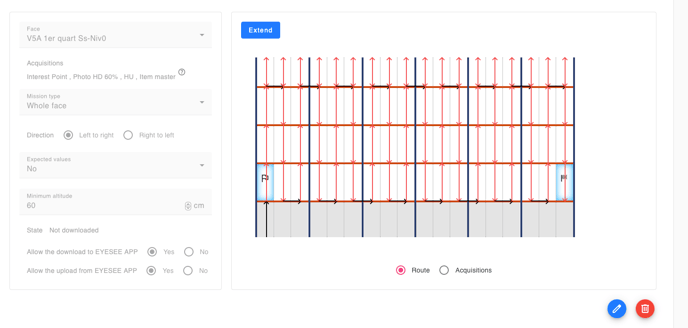
By clicking on this mission in the list, you can visualize the mission

1. Modify a mission: click on the modification icon and save.
Note: A mission can be changed as long as it has not been downloaded on the tablet.
2. Delete a mission: click on the delete icon.
State:
The mission state evolves according to a user or a drone action.
There are 3 different task states:
- Not downloaded: when a mission is created
- Downloaded: when the mission is downloaded on the tablet
- Performed: when the drone performed the mission, and the result is uploaded from the tablet to the cloud
From the tablet, to be able to download this mission, you need to link it to the EYESEE Cloud.
